MAPS Application Clients
The Applications screen is where you can view details of the application clients that are downloaded to end users' machines when they access any of the MAPS applications. This is in contrast to the Mapplets screen, which lists the server-side components of each installed application. The Applications screen also allows you to grant access rights for the various MAPS applications.

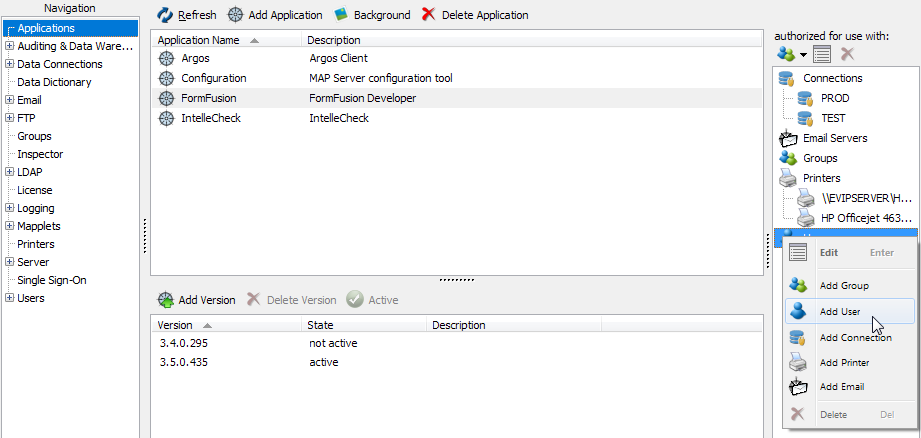
Selecting a product displays all of the installed versions of that product in the bottom pane. Each version is either active or not active. If there is more than one active version of a client application, when a user logs in to that product they will be prompted to select the version they want to run. This is a good technique to use if you are testing a new version of the software and want to allow users to access both versions. Otherwise, you can deactivate the older versions of the application (or delete them) so the user will not need to select a version every time they log in.
Adding and Deleting Application Clients
Under normal circumstances, you should never need to manually add or delete an application client. Deleting an application client using the Delete Application button removes that application client from MAPS. The mapplet and the application's database will be left intact on the server; only the application client files will be removed. To remove the mapplet, go to the Mapplets screen.
As long as you are licensed for an application, you can install or reinstall it at any time by checking for updates in MAPS.
Adding Application Authorizations
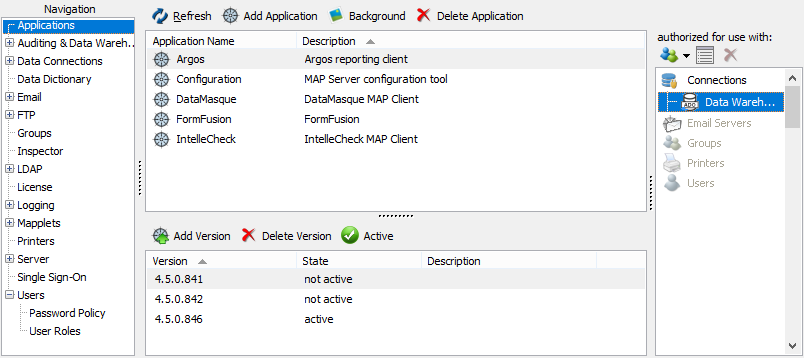
Before a user can access an application, you must authorize them (or a group they are a member of) to use that application. Similarly, you will need to add authorizations for each data connection, email server, and printer that you wish to use with a particular application. The connection, email server, group, etc. must have been previously defined in MAPS on the appropriate screen.
To add an authorization, first select the application you wish to add the authorization for. Then, in the Authorized for use with pane on the right, either right-click in the pane or use the dropdown menu to add a group, user, connection, printer, or email server.
Depending on which type of authorization you are adding, select the desired item(s) from the list and click OK.
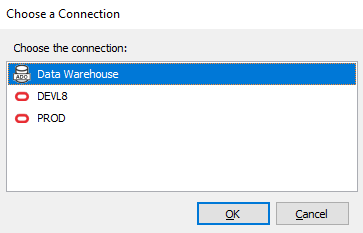
The selected data connection is now authorized for use with Argos.
In a similar manner, you will need to authorize the users and groups who will need access to the application. The system group "Everyone" can be used to quickly give access to all users to a particular product. This is useful in testing situations, but should be used with caution in production environments.
You may choose to authorize groups of users based on their MAPS or LDAP group membership, or give access to individual MAPS or LDAP users.
MAPS validates user accounts when logging in to an application as follows:
If one of these conditions is met and the password is correct, the user will be logged in to the application.
Note: Application authorization pertains to being able to log in to the application only. Some applications have additional object-level security that is applied within the application (for example, permissions to access specific Argos reports or FormFusion environments).
If you do not see the connection, printer, group, etc. that you are looking for, go to that section in the Configuration tool and ensure it has been added to the server.
Application Version Maintenance
As new versions of the applications are released, you may find that you have a significant number of application versions stored on the server for each of the various MAPS applications. There is no limit to the number of versions you can have stored on the server; however, you should be aware that storing large numbers of the applications will increase the disk usage on the machine where MAPS is installed. While each instance of the application may only be a few megabytes, if you are retaining large numbers of backups on your server you should keep in mind that each backup will also have a copy of all of the application versions stored on the server. Removing old, unused versions that you are unlikely to revert back to can help to reduce the size of the backup files.
To delete an old version, select the version number that you wish to remove and select Delete Version.
If you are unsure whether you may need to use a version again, you can deactivate it by selecting that version and toggling the Active button.
In rare situations, Evisions Support may request that you manually add a specific version of the application to your server. The Add Version button lets you browse for a specific application version and load it from a file. Under normal circumstances, you would install updates only via the Check for Updates button at the bottom of the Configuration tool. You may also use the Add Version button to add a specific application version from one of your backup files, if necessary.
Setting Background Images
Some applications allow you to choose a background image, such as your institution's logo, to be displayed within the product. At this time, only the Argos Windows client supports the background image. Select an application and then click the Background button to browse for a .png file to set as the background. In Argos, the image you choose will appear anchored in the lower right corner of the main window after you log in.